

This page is for you if you are developing a Windows Service and want to update it automatically on your users' systems. You'll get a brief tour of Omaha, Google's open source framework for automatic updates. And in a mini-tutorial, you'll see how Omaha can be used to release new versions of an exemplary Windows Service.
Omaha is the Google technology behind automatic updates in Chrome and other applications. Omaha runs on hundreds of millions (if not billions) of Windows PCs because Chrome is installed almost everywhere. Updates are a critical security feature of Chrome so Google have to make sure that Omaha works well in an exceptionally wide variety of environments. These facts combined make Omaha the strongest automatic update framework.
As it turns out, Omaha is also well-suited for updating Windows Services. There are two reasons for this. First, Omaha's default mode of operation is to run silently in the background. This is exactly how Windows Services operate. Second, unlike other update frameworks, Omaha lives as a separate application. This means that the internals of your Service implementation do not need to be changed to add support for automatic updates.
In all likelihood, Omaha is running on your computer in this very moment. This is because you probably have Chrome or Microsoft Edge, which both use Omaha under the hood. So let us quickly check it out!
Open C:\Program Files (x86)\Google\Update (or ...\Microsoft\EdgeUpdate ) on your computer:
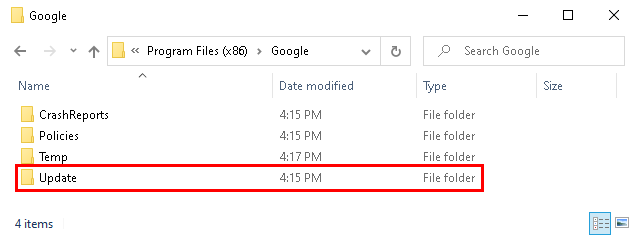
This is where Google's (or Microsoft's) Omaha update client is installed. If you don't see the above folder, you can also check %LOCALAPPDATA%\Google\Update .
Next open the Windows Task Scheduler. The quickest way to get there is to press Win+R and enter taskschd.msc. You should see Omaha's entries there:

In the screenshot above, the highlighted area means that Google's update client (a.k.a. Omaha) checks for updates every day at 4:20 PM. If you have Edge, then you will similarly see MicrosoftEdgeUpdate in the Task Scheduler.
When Omaha runs, it asks its update server "I have version 1. Is there an update?". The server responds "Yes, there's version 2. Use https://..../ install-v2.exe to update." In this communication, neither Omaha itself nor the update server know what install-v2.exe does. Omaha simply downloads and executes the file. It does not require any special knowledge about the applications it manages.
The final piece of the puzzle lies in the Windows registry. Open your registry editor and navigate to the path shown in the screenshot below. You will see all Google products installed on your system and managed by Omaha.
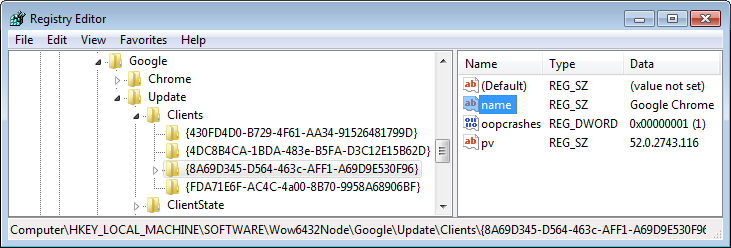
Every application that wants to be managed by Omaha needs to have a registry entry in
...\Google\Update\Clients
. (In your case, you will have a different parent key such as ...\
YourCompany\Update
.) In the screenshot, you see the registry entry which tells Omaha that Chrome is currently installed at version
52.0.2743.116. When Omaha runs, all it does is to look at the above registry keys
. For each of them, it sends the respective version to the update server. If the update server responds with the
URL of a .exe (or .msi), then Omaha downloads and runs that executable. The only thing Omaha expects as a result
is that the executable updates the application's version in the registry to the new value. This ensures that
Omaha can send the new version number to the server the next time it runs.
With the above knowledge, we can now update a simple Windows Service with Omaha. You can find the complete source code in the GitHub repository https://github.com/omaha-consulting/auto-update-windows-service .
When you look at the source code , you will find that all our exemplary Service does is to create a log file at C:\OmahaDemoService.log . It has the following contents:
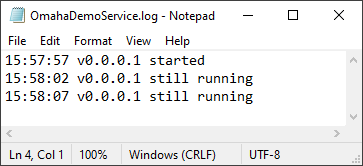
So the log file says when the Service was started, when it was running and its version. This will be useful
later when we test that the Service was updated.
Do you remember from above that Omaha works solely on the basis of .exe (or .msi) files? This means that, for
every new version of our Service, we need to produce a self-contained executable that is able to install or
update to that specific version.
We will use
NSIS
for this task. It is one of the most popular installer creation tools. You can find the source code for the
installer in
Installer.nsi
in the GitHub repository. If you don't want to compile it yourself, you can download the pre-compiled binaries
from the
GitHub Releases page
.
When you run the installer, you get a typical graphical installation wizard:
But here is what will be really useful: The installer supports silent installation by invoking it from the
command line with the flag
/S
. This will let us use the installer in conjunction with Omaha, which requires that update binaries run
silently.
Omaha obtains new versions from an update server. This server needs to speak the open source Omaha protocol. To
get immediate access to a free test server, please enter your email address below. We will use the server in the
coming steps to install and update our service.
Before we discuss the implementation, let us see everything in action by releasing a version of our Service with
Omaha.
If you installed the Omaha Demo Service from the GitHub Releases page above, please uninstall it. You can find
it in Windows'
Add/Remove Programs
control panel.
Log into your Omaha update server. Click on
Omaha/Applications
on the left and add an application with Id
{C48667BA-C57A-4DFE-B219-6DB6C466E2CA}
and name
Omaha Demo Service
. Do include the curly braces { } when you enter the id. The id was randomly chosen but it must be the same as
in
Installer.nsi
.

Click on
Versions
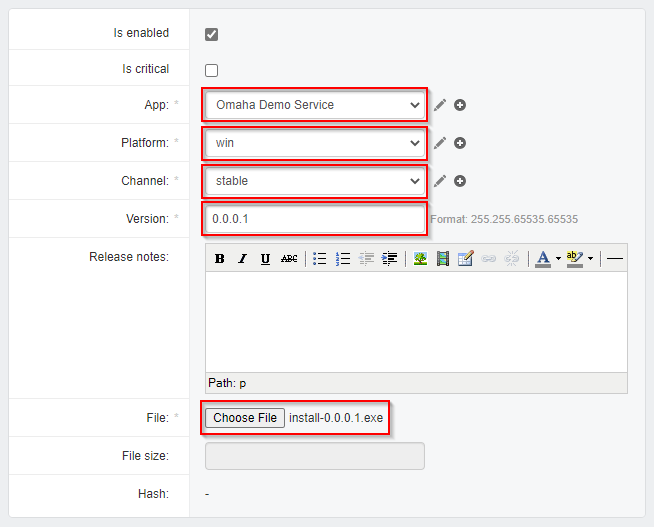
on the left and then the green button in the top right corner to add a new version. Select
Omaha Demo Service
as the Application,
win
as the Platform,
stable
as the Channel and enter
0.0.0.1
as the Version. As the File, upload
install-0.0.0.1.exe from the GitHub releases page
(or your own compiled copy of Installer.nsi).
Before you click
Save
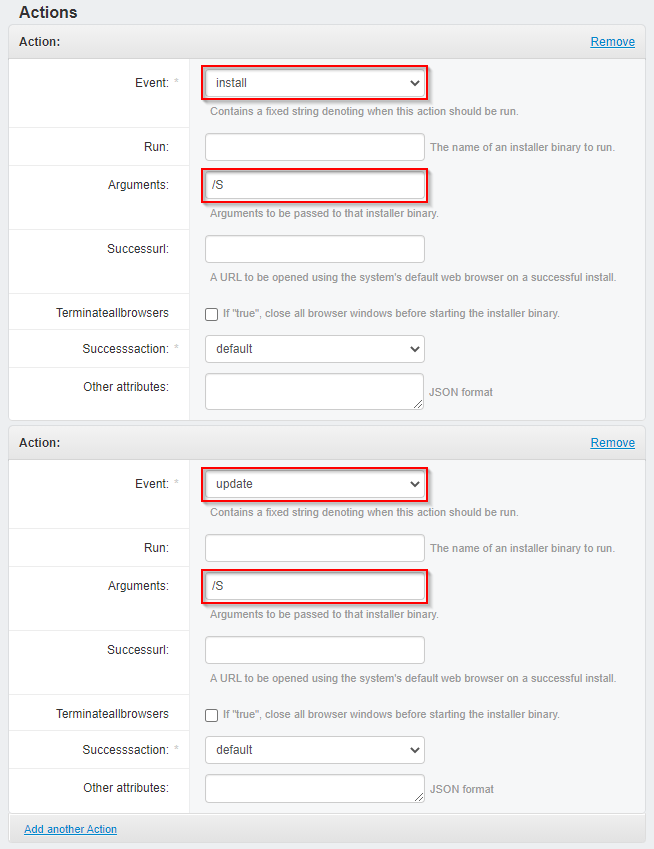
, add two Actions below the main form: One for the
install
Event, and one for
update
. In both, add the Argument
/S
.
Then click
Save
to create your version.
Do you remember from above that Google and Microsoft have separate registry keys for Omaha? Google use
...\Google\Update
whereas Microsoft have
...\Microsoft\EdgeUpdate
. When you employ Omaha in your own project, you will likewise have
...\YourCompany\Update
. And you will have further settings that are different from Google and Microsoft. For example, you will use
your own update server URL.
The registry keys and update server URL are hard-coded in Omaha's C++ source code. If you want to use Omaha for
your own project, then you need to change these values and re-compile Omaha. We can help you with this. However,
for now, we will use a trick that lets you use your own update server without having to modify Omaha's code.
Open the registry editor, create the registry key
HKLM\Software\Wow6432Node\OmahaTutorial\UpdateDev
and set the string value
url
to the domain of your update server plus
/service/update2
as in this screenshot:

Omaha respects this registry setting as a dynamic override for the update server URL.
Now, as explained in the introduction, Omaha lives as a separate application. This means that if we want to
update our service on our users' systems, then we need to install both Omaha and our service on their machines.
Omaha provides a convenient mechanism for this called
tagged metainstallers
. These are small online installers that set up Omaha, then use it to install the latest version of a hard-coded
application from an update server. When you go to Chrome's official download page, then the main installer you
receive is exactly such a tagged metainstaller built with Omaha.
To install our service with Omaha, download and run
OmahaDemoServiceSetup.exe
. This is the tagged metainstaller for this tutorial. It is configured to fetch and install the application with
the id
{C4...}
from above. Because you set the
UpdateDev
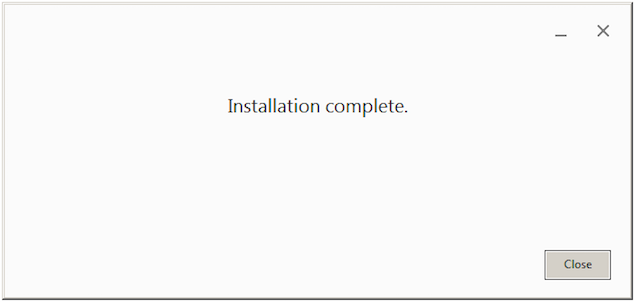
registry key, it will download and install the service from your server. If everything goes according to plan,
then you should eventually see the following window:
You can then open
C:\OmahaDemoService.log
to further convince yourself that the service is running:

If you encounter any problems, please take a look at the "Troubleshooting" appendix at the bottom of our
Google Omaha Tutorial
.
Several parts played together when we just installed our Service with Omaha. Here is a brief overview of what
happened.
We uploaded
install-0.0.0.1.exe
to your update server. When we did this, we defined on the update server that the id of our application is
{C4...}
. An important point is that install-0.0.0.1.exe
sets a registry key with the same id
,
...\Update\Clients\
{C4...}
. Likewise, our tagged meta installer
OmahaDemoServiceSetup.exe
is hard-coded to fetch the application with id
{C4...}
from the server.
So when you run
OmahaDemoServiceSetup.exe
, then it first installs Omaha itself. Then, it asks Omaha to download and install the application with id
{C4...}
from the update server. Because we set the
UpdateDev
registry key, Omaha contacts your server and asks "
Do you have an update for application {C4...}?
". The server responds "
Yes. Use https://.../install-0.0.0.1.exe to install it.
" Omaha downloads and runs this file. This file sets the registry key
...\Clients\{C4...}
, which tells Omaha that the installation was successful. From this point on, Omaha will run in the background
via the Windows Task Scheduler and periodically polls your server for updates.
Let us now use Omaha to release a new version of our service. Upload install-0.0.0.2.exe from the
GitHub Releases page
to the update server, defining the same
install
and
update
actions as above but specifying 0.0.0.2 as the version number. Then force an immediate update check as follows:
1. Open a command prompt as Administrator and type the following command:
taskkill /IM OmahaTutorialUpdate.exe /F
2. Delete the registry value
HKLM\SOFTWARE\WOW6432Node\OmahaTutorial\Update\LastChecked
(if it exists).
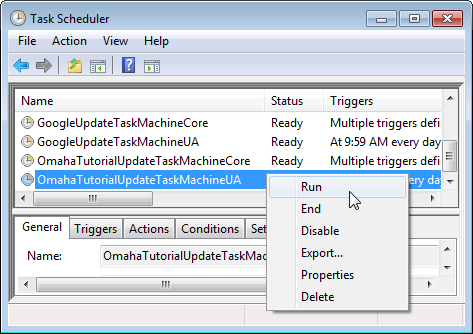
3. Open the Windows Task Scheduler and run
OmahaTutorialUpdateTaskMachineUA
.
4. Keep refreshing the Task Scheduler window with F5 until the task's state switches from
Running
back to
Ready
.
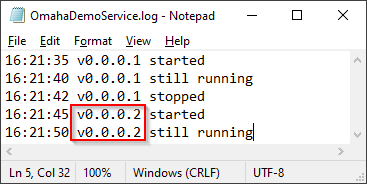
5. Open
C:\OmahaDemoService.log
with a text editor. If everything went well, you should now see the text
"v0.0.0.2 running"
. If yes, then your service was successfully updated from the server!
You may now be keen to use Omaha to update your own Windows Service. To do this, follow the instructions in
Installer.nsi
to adapt it to your project. Ideally, you will be able to define a new version, 0.0.0.3, that you can upload to
your update server as before. If you have any questions, feel free to get in touch with us.
Once you are done with this tutorial, you may want to remove any of its remnants from your system. To do this,
delete the application "Omaha Demo Service" via Windows'
Add/Remove Programs
control panel. This leaves Omaha on your system, until it realizes in its next update check that its
Clients\
registry key is empty, upon which it uninstalls itself. If you do not want to wait for this to happen, then you
can kill all running instances of OmahaTutorialUpdate.exe via the
taskkill command
shown above, then execute the command line given in the registry key
HKLM\SOFTWARE\WOW6432Node\OmahaTutorial\Update\UninstallCmdLine
. Typically, it is
"C:\Program Files (x86)\OmahaTutorial\Update\OmahaTutorialUpdate.exe" /uninstall.
Omaha is the update framework used by Google to update applications such as Chrome. Omaha runs on hundreds of
millions (if not billions) of devices. This widespread use, and the fact that an esteemed company such as Google
is behind it, makes Omaha the gold standard for update systems.
When it comes to updating Windows Services, Omaha's asynchronous nature makes it an especially good fit. We saw
the source code of a simple service, and how it can be integrated with Omaha. We used this to successfully
release a new version of the service. Finally, we explained how you can apply the lessons learned here to update
your own service.
As mentioned further above, using Omaha in non-Google projects requires modifying its C++ source code. You also
need an update server that is more permanent (and possibly scalable) than the test server you received above. We
can help you with both of those things, or other questions you may have about automatic updates. Simply send us
a message using the button below. We usually get back to you within one business day.
Thank you for taking this tutorial!